How To Make Perfect Challah Bread Every Time – A Step-by-step Guide
What To Know
- Take the 4th rope and cross it over the 2nd rope, then the 5th rope over the 3rd rope, and finally, the 6th rope over the 4th rope.
- Whether it’s for a special occasion or a weekly treat, a perfect challah is always a welcome addition to the table.
- Store challah bread at room temperature for 2-3 days or in the refrigerator for up to a week.
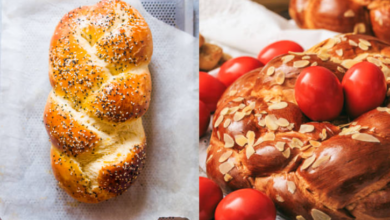
Challah bread, a staple of Jewish cuisine, is not only delicious but also visually stunning. Its intricate braids symbolize unity and abundance, making it an essential part of many celebrations. This comprehensive guide will empower you with the knowledge and techniques to plait challah bread like a pro.
Crafting the Perfect Dough
The foundation of a beautiful challah lies in a well-crafted dough. Use high-quality bread flour, warm water, yeast, sugar, salt, and olive oil. Follow the recipe precisely to achieve the right consistency – neither too sticky nor too dry.
Dividing and Shaping the Dough
Once the dough has risen, divide it into equal portions (usually 3 or 4). Roll each portion into a long, thin rope. The thickness and length of the ropes will determine the size and complexity of your braid.
Basic 3-Strand Braid
For a classic 3-strand braid, place the ropes parallel to each other. Cross the left rope over the center rope, then the right rope over the new center rope. Repeat this pattern until you reach the end of the ropes.
4-Strand Braid
For a more elaborate look, try a 4-strand braid. Begin by dividing the dough into 4 equal ropes. Place 2 ropes parallel to each other, then cross the left rope over the center rope. Take the 3rd rope and cross it over the 2nd rope, then the 4th rope over the 3rd rope. Continue alternating the crossing pattern until the end.
6-Strand Braid
This intricate braid is perfect for special occasions. Divide the dough into 6 ropes. Place 3 ropes parallel to each other, then cross the left rope over the center rope. Take the 4th rope and cross it over the 2nd rope, then the 5th rope over the 3rd rope, and finally, the 6th rope over the 4th rope. Repeat this pattern until the end.
Round Challah
For a different presentation, shape your braided dough into a round challah. Tuck the ends of the braid under the loaf to form a circle.
Baking to Perfection
Place your plaited challah on a greased baking sheet. Brush with an egg wash (1 egg beaten with a splash of water) for a golden crust. Bake at 350°F (175°C) for 25-30 minutes, or until golden brown.
Tips for Success
- Use bread flour for a stronger dough.
- Let the dough rise twice for a fluffier result.
- Keep the dough slightly sticky to make it easier to braid.
- Don’t overwork the dough, as it can toughen it.
- Practice makes perfect! The more you plait, the better you will become.
The Ending: A Braided Masterpiece
With patience and practice, you can create beautiful and delicious plaited challah bread that will impress your family and friends. Whether it’s for a special occasion or a weekly treat, a perfect challah is always a welcome addition to the table.
Questions We Hear a Lot
Q: Can I use different flours for challah bread?
A: Yes, you can use all-purpose flour or a combination of flours, such as whole wheat or rye.
Q: How can I make my challah bread more flavorful?
A: Add herbs, spices, or dried fruit to the dough before braiding.
Q: What if my challah bread gets too brown?
A: Cover the bread with aluminum foil during the last 10 minutes of baking.
Q: How long can I store challah bread?
A: Store challah bread at room temperature for 2-3 days or in the refrigerator for up to a week.
Q: Can I freeze challah bread?
A: Yes, wrap the bread tightly in plastic wrap and freeze for up to 2 months. Thaw at room temperature before serving.